Creating a data pipeline with Azure and Snowflake
What is Snowflake?
Snowflake is a cloud-based data warehousing platform that enables users to efficiently store, organize, and analyze vast amounts of structured and semi-structured data. It is designed to be highly scalable and flexible, allowing quick and easy access to query data. It offers a comprehensive set of tools for data integration, data management, and data warehousing, and includes advanced features such as data sharing and data exchange, which allows sharing and exchanging data with other organizations or individuals.
What is a data pipeline?
A data pipeline is a set of processes and systems that are used to extract data from various sources, transform the data into a format that is suitable for analysis, and load the data into Snowflake for storage and querying. In the context of this article, a data pipeline may involve extracting data from external sources such as databases, flat files, ERP, CRM and other kind of systems which are located on-prem and not in the cloud. Using some form of ETL (extract, transform, load), the data is transformed and cleaned and then loaded into Snowflake for storage and querying using SQL. Snowflake also provides a range of tools and features to help with building and managing data pipelines.
Prequisites
We need a couple of things before we get started, the Github repo is also available here.
Required
- Snowflake account, you can create one for free
- Azure account, you can create one for free
- Azure CLI installed and authenticated
- Terraform installed
Optional
- Snowsql to interact with your snowflake account from your pc
Defining the Azure infrastructure as code
To create a blob storage container with the current az cli user as a Storage Blob Data Contributor, create the following two terraform files
hclmain.tfterraform {required_providers {azurerm = {source = "hashicorp/azurerm"version = "3.30.0"}}}provider "azurerm" {features {}skip_provider_registration = true}resource "azurerm_resource_group" "lab" {name = var.resource_group_namelocation = var.azure_region}resource "azurerm_storage_account" "lab" {name = var.azurerm_storage_account_nameresource_group_name = azurerm_resource_group.lab.namelocation = azurerm_resource_group.lab.locationaccount_tier = "Standard"account_replication_type = "LRS"}resource "azurerm_storage_container" "lab" {name = var.azurerm_storage_container_namestorage_account_name = azurerm_storage_account.lab.namecontainer_access_type = "private"}data "azurerm_client_config" "current" {}resource "azurerm_role_assignment" "lab" {scope = azurerm_storage_account.lab.idrole_definition_name = "Storage Blob Data Contributor"principal_id = data.azurerm_client_config.current.object_id}
hclvars.tfvariable "azure_region" {description = "Azure region for all resources."type = stringdefault = "eastus2"}variable "resource_group_name" {type = string}variable "azurerm_storage_account_name" {type = string}variable "azurerm_storage_container_name" {type = string}
then initialize and see if everything is looking ok
bashterraform initterraform plan
apply the changes to create the infrastructure
bashterraform apply
You will be asked what the ressource group, storage account and container name should be called. You are free to choose whatever you would like to call them.

Note down the storage_account's id (it starts with id=) as well as the storage_container's URL (it starts with id=https://). We will use this information in the following steps.
Linking the External staging Snowflake
Now that our staging area is setup from Azure's side. We need the tenant id to register the Azure account with Snowflake, you can use the az cli to get it quick
bashaz account list
use the one listed under your active Azure subscription.
Now we need to authenticate for Azure. To create an Azure storage integration, either sign in on Snowflake and use a worksheet or use snowsql for the following. I'm using a worksheet (when signed in to Snowflake) for the next two Snowflake sql queries and for the rest I will be using snowsql (you can use the .snowsql/config to authenticate with your main account or use the environmental variables/cli for new user).
sqluse role accountadmin; -- only accountadmin has the privilige, can grant this to different roles as neededCREATE STORAGE INTEGRATION AzureStorageTYPE = EXTERNAL_STAGESTORAGE_PROVIDER = 'AZURE'ENABLED = TRUEAZURE_TENANT_ID = 'your_tenant_id'STORAGE_ALLOWED_LOCATIONS = ('azure://your_storage_account.blob.core.windows.net/your_storage_container/')
You can specifically limit the paths with STORAGE_ALLOWED_LOCATIONS or block paths with STORAGE_BLOCKED_LOCATIONS. Here use URL from the storage container (that we got from terraform) with azure:// as prefix.
Execute the following query to get the consent url
sqldesc storage integration AzureStorage;
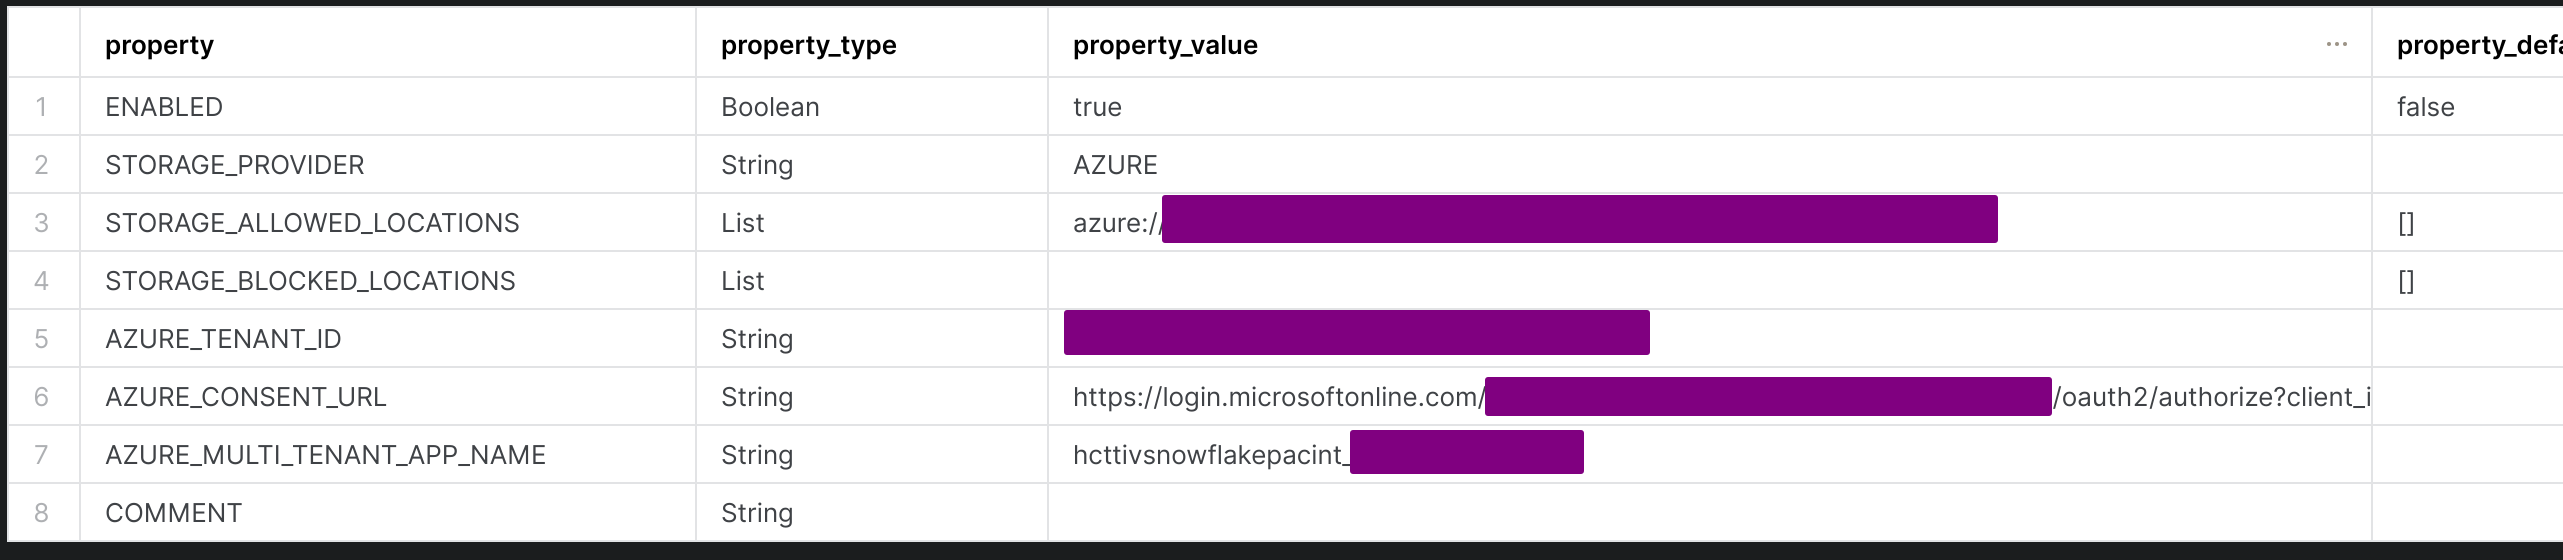
Copy and paste the AZURE_CONSENT_URL in the browser and click Accept when prompted.
Now use the Azure CLI to set the role for the service principal, using the AZURE_MULTI_TENANT_APP_NAME before the underscore. In my case
bashaz ad sp list --display-name "hcttivsnowflakepacint" --query "[].{displayName:displayName, id:id}"

To set the role with the CLI, do
bashaz role assignment create --assignee "id" --role "Storage Blob Data Contributor" --scope "/subscriptions/some_number/resourceGroups/your_resource_group/providers/Microsoft.Storage/storageAccounts/your_storage_account"
where the id comes from the az ad sp list command and the scope is from the storage_account's output we generated earlier with terraform.
You can also alter the allowed locations within the storage container if needed. I only need one location, call it staging
sqlALTER STORAGE INTEGRATION AzureStorage SETSTORAGE_ALLOWED_LOCATIONS = ('azure://your_storage_account.blob.core.windows.net/your_storage_container/staging')
Setting up Snowflake for loading data
Now we need a role and preferably a new user to use the staging area. We are also creating a new database and schema to load in our data as well as the warehouse which is going to do the compute work, then we are creating the external stage for snowflake to load data.
Note that we are changing roles when issuing commands that requires higher or lower priviliges. This is good practice in my opinion where the user should always try and use a role with the least amount of priviliges.
sqlset my_role = 'rawdataloader';set my_username = 'loader';set my_warehouse = 'loaddw';set my_database = 'mydb';set my_schema = 'raw';set my_storage_integration = 'AzureStorage';set my_external_staging = 'ExternalStaging';-- set the passwordset my_password = 'my_super_secure_password';begin;use role securityadmin;create role if not exists identifier($my_role);grant role identifier($my_role) to role SYSADMIN;-- create usercreate user if not exists identifier($my_username)password = $my_passworddefault_role = $my_roledefault_warehouse = $my_warehouse;grant role identifier($my_role) to user identifier($my_username);use role sysadmin;-- create Warehousecreate warehouse if not exists identifier($my_warehouse)warehouse_size = xsmallwarehouse_type = standardauto_suspend = 60auto_resume = trueinitially_suspended = true;-- create databasecreate database if not exists identifier($my_database);-- grant warehouse accessgrant USAGEon warehouse identifier($my_warehouse)to role identifier($my_role);-- grant database accessgrant OWNERSHIPon database identifier($my_database)to role identifier($my_role);commit;begin;USE DATABASE identifier($my_database);-- create schema for dataCREATE SCHEMA IF NOT EXISTS identifier($my_schema);commit;begin;-- grant schema accessgrant OWNERSHIPon schema identifier($my_schema)to role identifier($my_role);--grant OWNERSHIP on schema public to role identifier($my_role); we will use another role for the ownershipcommit;begin;grant create stage on schema identifier($my_schema) to role identifier($my_role);use role securityadmin;grant usage on integration identifier($my_storage_integration) to role identifier($my_role);commit;begin;use role identifier($my_ROLE);USE DATABASE identifier($my_database);USE SCHEMA identifier($my_SCHEMA);create stage identifier($my_external_staging)storage_integration = AzureStorageurl = 'azure://your_storage_account.blob.core.windows.net/your_storage_container/staging';commit;
To test I can list the files within the stage
sqllist @ExternalStaging;
There should be nothing in there for now. Let's create a random file and upload it to our container. From the command line do the following, entering your newly created storage account and storage container as variables
bashtouch randomfileexport your_storage_account=your_storage_accountexport your_storage_container=your_storage_containeraz storage blob upload -f randomfile --account-name $your_storage_account --container-name $your_storage_container --auth-mode login --name staging/randomfile
Now again in Snowflake
sqllist @ExternalStaging;

Cool, everything looks good. Let's create our loading file formats. I'm usually using csv and parquet files for loading.
sqlcreate or replace file format my_csv_formattype = csvfield_delimiter = ','skip_header = 1null_if = ('NULL', 'null')empty_field_as_null = truecompression = AUTOFIELD_OPTIONALLY_ENCLOSED_BY = '0x22';create or replace file format my_parquet_formattype = parquet;
The csv format I defined to skip the header and the FIELD_OPTIONALLY_ENCLOSED_BY option is that Snowflake know's my data enclosed by the " character.
Creating the data-pipeline from on-premise to Snowflake
In order to use data we are gathering from different kinds of systems on-premise (be it ERP, CRM, PDM systems or flat files on a network). We need some application running on a VM which is collecting the data and pushing the files to the staging area. In order to do this we need to create a Azure service principal with the Storage Blob Data Contributor role.
If our dataloader can run within the ressource group we can use a managed identity (for the case if we are using webapi's etc), but for an application which has to run on-prem, a service principal is the nicest option.
To create a service principal for our dataloader
bashaz ad sp create-for-rbac --name dataloader
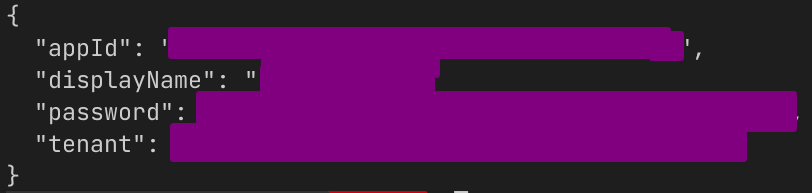
Note this information, as we are going to use this as environmental variables for the app, which is going to upload data to our storage container.
To see all our service principal accounts (if you want need to remove it later)
bashaz ad sp list --show-mine --output table
In order for our new service principal to use the storage account, we also need to assign it the Storage Blob Data Contributor role. For this we need the appID from the previous step and also the storage account id from the output of terraform.
bashaz role assignment create --assignee $appID --role "Storage Blob Data Contributor" --scope $storage_account_id
So it looks like
bashaz role assignment create --assignee "yourappid" --role "Storage Blob Data Contributor" --scope "/subscriptions/some_number/resourceGroups/your_resource_group/providers/Microsoft.Storage/storageAccounts/your_storage_account"
Now we can start creating a small upload application with our newly created service principal, you can create a env.sh file with the following (only use it locally, don't commit it to version control).
bashexport AZURE_CLIENT_ID="appID"export AZURE_TENANT_ID="tenant"export AZURE_CLIENT_SECRET="password"
I created a small python class to upload files to the staging area
pythonaz.pyimport osfrom azure.identity import DefaultAzureCredentialfrom azure.storage.blob import BlobServiceClientfrom pathlib import Pathclass Az:""""scans folder and uploads all files to unstaged in container"""def __init__(self, account_url="https://your_storage_account.blob.core.windows.net", container_name="your_storage_container"):# self.account_url = account_url# self.container_name = container_namedefault_credential = DefaultAzureCredential()service_client = BlobServiceClient(account_url, credential=default_credential)self.client = service_client.get_container_client(container_name)def list_files(self, local_path):return os.listdir(local_path)def upload(self, source, dest):'''Upload a file or directory to a path inside the container'''if (os.path.isdir(source)):self.upload_dir(source, dest)else:self.upload_file(source, dest)def upload_file(self, source, dest):'''Upload a single file to a path inside the container'''print(f'Uploading {source} to {dest}')with open(source, 'rb') as data:try:self.client.upload_blob(name=dest, data=data) # , overwrite=Trueexcept Exception as e:print(e)def upload_dir(self, source, dest):'''Upload the files of a directory to a path inside the storage container'''prefix = '' if dest == '' else dest + '/'for root, dirs, files in os.walk(source):for name in files:dir_part = os.path.relpath(root, source)dir_part = '' if dir_part == '.' else dir_part + '/'file_path = os.path.join(root, name)blob_path = prefix + nameself.upload_file(file_path, blob_path)def ls_dirs(self, path, recursive=False):'''List directories under a path, optionally recursively'''if not path == '' and not path.endswith('/'):path += '/'blob_iter = self.client.list_blobs(name_starts_with=path)dirs = []for blob in blob_iter:relative_dir = os.path.dirname(os.path.relpath(blob.name, path))if relative_dir and (recursive or not '/' in relative_dir) and not relative_dir in dirs:dirs.append(relative_dir)return dirsdef ls_files(self, path, recursive=False):'''List files under a path, optionally recursively'''if not path == '' and not path.endswith('/'):path += '/'blob_iter = self.client.list_blobs(name_starts_with=path)files = []for blob in blob_iter:relative_path = os.path.relpath(blob.name, path)if recursive or not '/' in relative_path:files.append(relative_path)return filesdef ls_files_sorted(self, path):if not path == '' and not path.endswith('/'):path += '/'blob_iter = self.client.list_blobs(name_starts_with=path)sortedByCreation = sorted(blob_iter, key=lambda x: x.creation_time, reverse=True)files = []for blob in sortedByCreation:files.append(blob.name)return filesdef download_first_match(self, paths, search, dest):match = next(f for f in paths if search in f)# [START download_a_blob]DESTDIR = destPath(DESTDIR).mkdir(parents=True, exist_ok=True)with open(DESTDIR + "/" + os.path.basename(match), "wb") as my_blob:download_stream = self.client.download_blob(match)my_blob.write(download_stream.readall())# [END download_a_blob]
Using it to upload files in an example directory to the staging area
pythonaz = Az(account_url="https://your_storage_account.blob.core.windows.net",container_name="your_storage_container")az.upload_dir("./example_dir", "staging")
To schedule loading data, you would either use Apache Airflow, and store the environmental variables as secrets in Airflow, or you can use Cron/Systemd for running scheduled jobs on Linux and for the windows systems, task scheduler.
When I execute the above I can upload all the files within the directory

Now with Snowsql (or in a Snowflake worksheet) you can see that the file is there
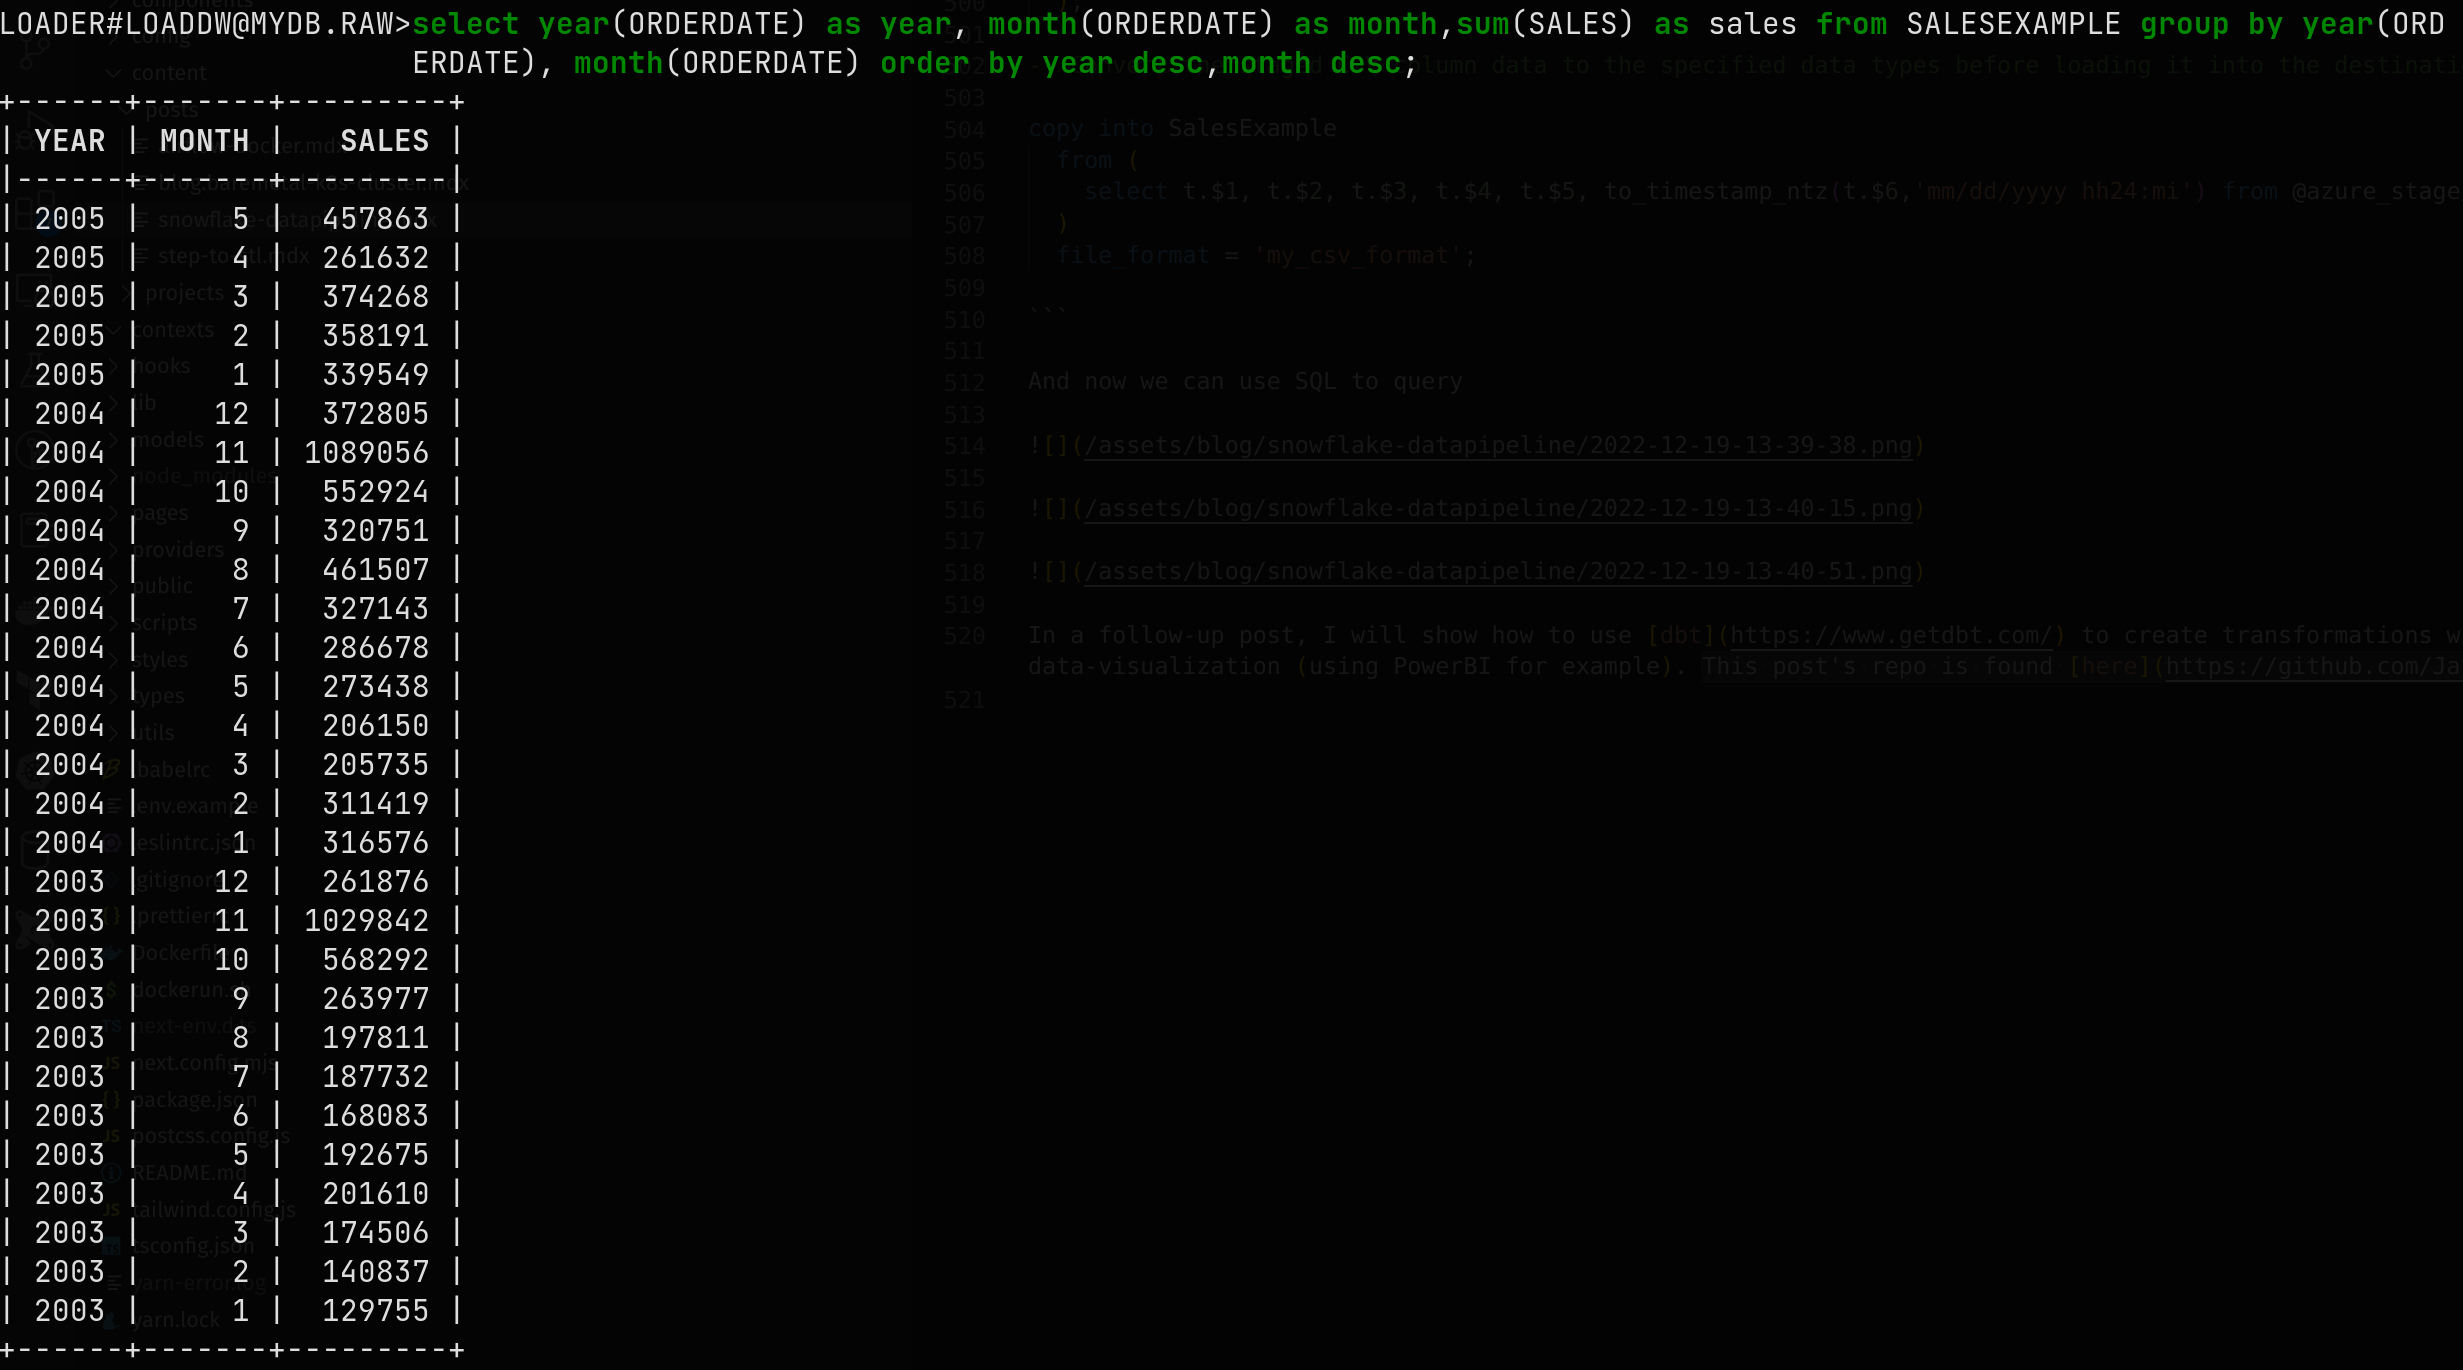
 You can query the file directly with Snowflake

To load the data to a table, create a target table and use the copy into command with a small transformation for the pesky american-style dates.
sql-- Create the target tablecreate or replace table SalesExample (ORDERNUMBER int,QUANTITYORDERED decimal,PRICEEACH decimal,ORDERLINENUMBER int,SALES decimal,ORDERDATE timestamp_ntz);-- Convert the staged CSV column data to the specified data types before loading it into the destination tablecopy into SalesExamplefrom (select t.$1, t.$2, t.$3, t.$4, t.$5, to_timestamp_ntz(t.$6,'mm/dd/yyyy hh24:mi') from @azure_stage/sales_data_sample.csv t)file_format = 'my_csv_format';
And now we can use SQL to query


In a follow-up post, I will show how to use dbt to create transformations with the data which was loaded in Snowflake and create roles for doing the data-visualization (using PowerBI for example). This post's repo is found here.