DBT Core - Generating dbt models from Snowflake
What is dbt
DBT (Data Build Tool) is a open-source tool that helps data analysts and data engineers develop and maintain data pipelines. It is designed to work a variety of databases and aims to make it easier to build, test, and deploy data transformations.
It is built on top of SQL, and provides a set of declarative commands that can be used to define and manipulate data. It includes a number of features that make it easier to work with data, including support for version control, testing, and documentation. DBT also includes a CLI (command-line interface) that can be used to run and manage data pipelines, as well as a web-based UI for visualizing and interacting with data.
DBT is commonly used in the context of data warehousing and business intelligence, where it can be used to build and maintain the data pipelines that feed data into analytical tools like PowerBI, Tableau and Looker. It is also used in a variety of other contexts, such as data lakes, data marts, and ETL (extract, transform, load) processes.
Why use dbt?
The main reasons to pick dbt over other tools are:
-
It's SQL! Anyone remotely interested in data knows SQL, it's a widely-used and powerful programming language for working with data.
-
DBT supports testing and version control, which helps to ensure the quality and reliability of data pipelines.
-
DBT includes a number of plug-ins and extensions that can be used to extend its functionality, such as support for additional databases and code generation.
-
DBT is used by a wide range of organizations, which means that there is a large community of users and a wealth of resources available to help you get started and troubleshoot issues.
dbt core vs dbt cloud
DBT (Data Build Tool) Core is the open-source version of DBT that you can download and install on your own computer or server. It includes a command-line interface (CLI) that you can use to run and manage data pipelines, as well as a web-based UI for visualizing and interacting with data.
DBT Cloud is a commercial product offered by Fishtown Analytics that provides a cloud-based platform for running DBT pipelines. It includes all of the features of DBT Core, but with the added convenience of being able to run pipelines in the cloud. This can be useful if you don't want to manage your own infrastructure, or if you need to scale your pipelines to run on large amounts of data.
One key difference between DBT Core and DBT Cloud is that DBT Cloud includes additional features that are not available in the open-source version. These include:
-
Automatic scheduling: DBT Cloud can automatically schedule your pipelines to run on a regular basis, without the need to manually trigger them.
-
Collaboration tools: DBT Cloud includes tools for collaborating with your team, such as the ability to share pipelines and track changes.
-
Monitoring and alerts: DBT Cloud includes monitoring and alerting features that can help you keep track of the health and performance of your pipelines.
DBT Core, could essentially be used in a similar manner as DBT Cloud, but you would be responsible for the infrastructure (for example using Apache Airflow for scheduling).
Installing dbt core
First of all, it's a good idea to either install mamba or miniconda so that it's easy to create new python environments. I installed mamba in this case, its a drop-in replacement for conda and uses the same commands and configuration options as conda, but it's faster and more lightweight. With mamba installed , create a new env, activate it and install the dbt dependencies (together with some other useful packages).
bashmamba create -y -n de -c conda-forge python=3.10 pip-tools pandas numpy ipykernel sqlalchemy psycopg2 pyodbc plotly plotly_express xlrd openpyxlmamba activate depip install dbt-core dbt-postgres dbt-snowflake
I'm installing both the postgres and snowflake adapters as I use both. Now we need to create a dbt profile. Make a new folder where we will store our dbt projects
bashmkdir dbtprojectscd dbtprojects
Creating a dbt project
then we can initialize a new project.
bashdbt init
Follow the prompts, name your project. choose the adapter you want, in this case snowflake and enter your snowflake details. You will notice that there is a new file created under ~/.dbt/profiles.yml.
Now we can cd into the project directory (I'm calling it your_project_name) and create a new file called packages.yml
bashcd your_project_nametouch packages.yml
Installing dbt packages
In this file we could define all the dbt dependencies we would like to install. A useful package to install is called dbt-labs/codegen
ymlpackages.ymlpackages:- package: dbt-labs/codegenversion: 0.8.1
This package enables code generations macros. To install this dependency, in the cli use dbt
bashdbt deps
Generating dbt models
Now we are ready to code generate what we already have in Snowflake. First we have to create our sources.yml file under the models/your_project_name directory (you could rename the example directory to your_project_name and delete all the example schema.yml and sql models inside). For our example we can have the following with our SALESEXAMPLE table which is already in our database. Remember to change the source details (name, database and schema to match your snowflake details).
ymlversion: 2sources:- name: thesourcenamedatabase: your_snowflake_dbschema: your_snowflake_schemaquoting:database: trueschema: falseidentifier: falsetables:- name: SALESEXAMPLEidentifier: SALESEXAMPLEdescription: The example table we will use
Note that there is a pretty good best practices guide available on dbt's guides. I will only be showing how to quickly get started. Following the best practices (i.e. creating your folder structure) is up to you 😄.
With that done, we can generate our base model for the table via the command line
Using the CLI to generate models
bashdbt run-operation generate_base_model --args '{"source_name": "thesourcename", "table_name": "SALESEXAMPLE", "case_sensitive_cols": false}'
The output looks like the following (my sourcename)

Using VS-Code extensions to generate models
Another nice way to achieve the same result is to install the VS-Code extension dbt Power User. Once installed and you went through the extension's documentation, select the Python interpreter with dbt installed (in VS-Code CTRL+SHIFT+P -> Python: Select Interpreter -> Python 3.10.6('de') for our virtual environment). You could then generate the models directly from VS-Code, by clicking on the Generate model in the sources.yml file.

This will be our base model for the source table SALESEXAMPLE. The code generation is VERY useful with tables which have loads of columns (I'm pretty lazy when it comes to writing out column names). You can save the result within a new file. I just called it salesexample_base.sql.

In my base model, I don't need all the columns, So I end up with only the following
sqlsalesexample_base.sqlwith source as (select * from {{ source('mydb', 'SALESEXAMPLE') }}),renamed as (selectquantityordered,sales,orderdatefrom source)select * from renamed
To demonstrate I will make a simple grouped view with this model.
Create a new file models/example/salesexample_grouped.sql
sqlsalesexample_grouped.sqlwithsalesexample as (select * from {{ ref('salesexample_base') }}),final as (select year(orderdate) as year,month(orderdate) as month,sum(quantityordered) as totalordered,sum(sales) as totalsalesfrom salesexamplegroup by year(orderdate), month(orderdate)order by year desc, month desc)select *from final
If we want all our models in the example folder to be materialize as views by default then we need to make a small change in dbt_project.yml. We are changing +materialized to view.
ymlmodels:example:# Config indicated by + and applies to all files under models/example/example:+materialized: view
Note that alternatively, materializations can be configured directly inside of the model sql files with the config jinja function
{{ config(materialized='view') }}as the very first line of our file.
Running our dbt project
Last thing we need to do is to look at our schema.yml file, which is our definitions for our models. You can also add the column names if you want, they are not resources in and of themselves, but it's possible to define sub-properties like test to columns to test if a column contains no duplicates and no null values for example.
ymlversion: 2models:- name: salesexample_basedescription: 'SALESEXAMPLE table'columns:- name: quantityordered- name: sales- name: orderdate- name: salesexample_groupeddescription: 'SALESEXAMPLE table grouped by orderdate'
We can compile our dbt project with
bashdbt compile
If there are no errors, we can now execute the sql model files against our target database
bashdbt run
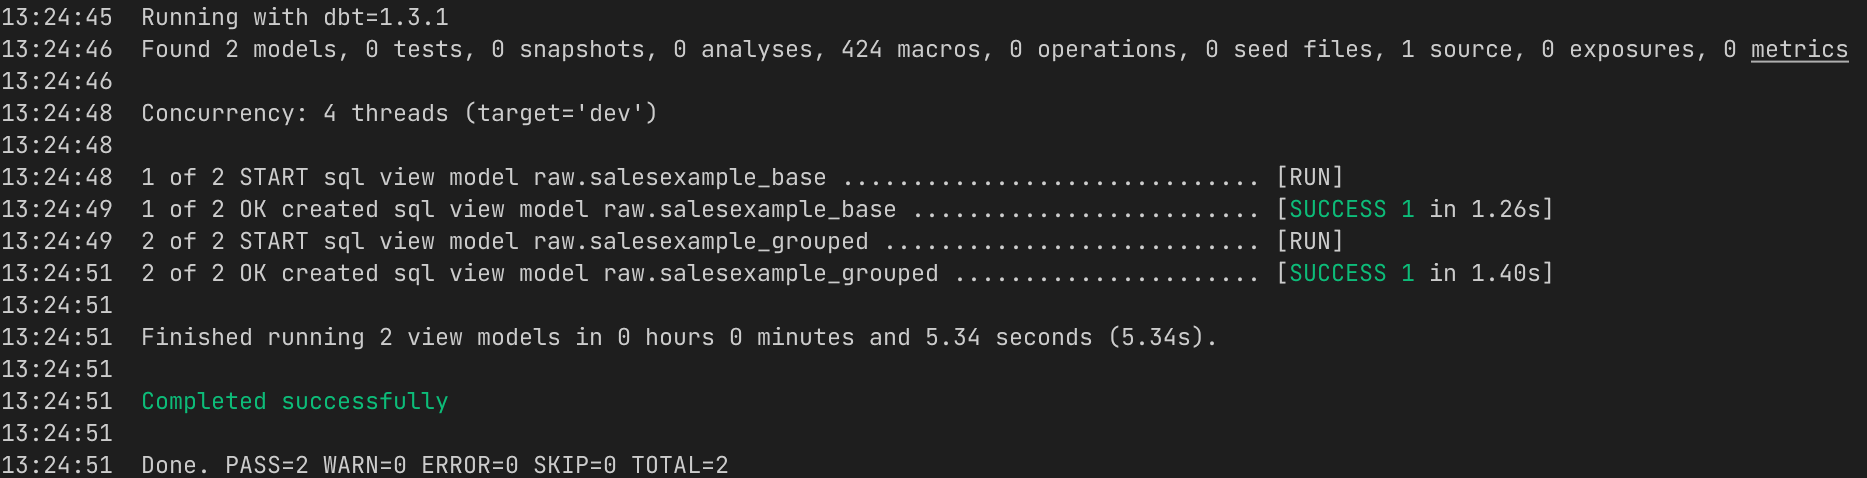
Now if we sign in to Snowflake, you will see the two new views are there with
sqlshow terse views;
